Pulumi provider
Introduction
Manually managing infrastructure can lead to errors and increased complexity. With Infrastructure as Code (IaC), however, we can describe our infrastructure in configuration files, making it predictable, reproducible and versioned.
This tutorial will guide you through using Pulumi, a modern IaC tool, to automate the deployment and updating of your virtual machines (VMs) on Xen Orchestra (XO).
Pulumi supports several programming languages (TypeScript, Python, Go, .NET, etc.), but we will use TypeScript for this example. To do this, you need to install Node/NPM version 20 or higher.
Pulumi's approach allows you to use real programming languages to define your infrastructure, offering more flexibility and power than traditional configuration languages.
Launching virtual machines in XO with Pulumi
In this tutorial, we will guide you through the process of using Pulumi to launch a virtual machine (VM) on your Xen Orchestra (XO) instance and demonstrate how to easily modify it.
Since Pulumi relies on the Xen Orchestra API to abstract hosts, pools, networks, disks and virtual machines (VMs), as well as to manipulate them declaratively, ensure you have a functioning Xen Orchestra instance connected to XCP-ng before you begin.
Here are the four main steps we will follow:
- Install Pulumi
- Create a Pulumi project
- Use Pulumi to provision the VM
- Add an additional network interface to the VM
The code used in this tutorial can be found on GitHub, but we will write it from scratch step by step.
Installing Pulumi
If you haven't installed Pulumi yet, follow the official Pulumi tutorial to install it on your system.
Required version: This tutorial requires Pulumi version v3.0+ or newer, as well as the Xen Orchestra provider version v2.0+.
Using VM Templates in Xen Orchestra
Pulumi needs a starting point to create a VM. This can be a template that already contains an operating system installed with cloud-init capabilities (or Cloudbase-init for Windows), as well as Xen/Guest Tools for better integration with Xen Orchestra.
We recommend using the pre-built templates from the XOA Hub for optimal results.
- Debian 13 (with cloud-init)
- Ubuntu 22.04/24.04 (with cloud-init)
- etc.
For more information on templates:
Provisioning your VM with Pulumi
Now that Pulumi is installed and you have a VM template ready in your environment, you can start writing the configuration files that describe your infrastructure.
-
Creating the Pulumi project
Create a new directory for your project and initialise the project:
mkdir xo-pulumi-project
cd xo-pulumi-project
pulumi new typescript -
Installing the Xen Orchestra provider
Install the Pulumi Xen Orchestra package:
npm install @vates/pulumi-xenorchestra -
Securely configuring credentials
In order to authenticate Pulumi with your Xen Orchestra API, credentials are required.
warningNever store passwords directly in your code. The recommended method is to use environment variables.
-
Create a
~/.xoafile in your home directory containing the following content:export XOA_URL=ws://hostname-of-your-deployment
export XOA_USER=YOUR_USERNAME
export XOA_PASSWORD=YOUR_PASSWORDOr, if you are using a token:
export XOA_URL=ws://hostname-of-your-deployment
export XOA_TOKEN=YOUR_TOKEN -
Then, before running Pulumi, load these variables into your terminal session:
eval $(cat ~/.xoa)
tipIt is also possible to use the Pulumi configuration to store the credentials.
pulumi config set xenorchestra:url ws://your-xo-hostname
pulumi config set xenorchestra:token YOUR_TOKEN --secret -
-
Defining existing resources (data sources)
Pulumi needs to be aware of the resources already in place in XO (e.g. your pool, network and storage). To achieve this, we use data calls to retrieve existing information.
Edit the
index.tsfile and replace its contents with:import * as pulumi from "@pulumi/pulumi";
import * as xenorchestra from "@vates/pulumi-xenorchestra";
// Retrieving the pool
const pool = xenorchestra.getXoaPool({
nameLabel: "Main pool",
});
// Retrieve the template
const template = xenorchestra.getXoaTemplate({
nameLabel: "Ubuntu 24.04 Cloud-Init",
});
// Retrieve the storage repository
const storageRepository = pool.then(p =>
xenorchestra.getXoaStorageRepository({
nameLabel: "ZFS",
poolId: p.id,
})
);
// Retrieve the network
const network = pool.then(p =>
xenorchestra.getXoaNetwork({
nameLabel: "Pool-wide network",
poolId: p.id,
})
);tipUsing explicit
nameLabelvalues is appropriate for this tutorial.
However, in real-world environments, it is recommended to use unique names to avoid conflicts or misconfigurations when multiple resources share similar labels. -
Defining the VM resource
Now that Pulumi knows where to find the template, storage and network, we can define the VM that we want to create.
Add the following code to the end of your
index.tsfile:tipIf your template uses multiple disks, make sure you declare the same number of disks in your VM resource and pay attention to the order. The disks must be at least the same size as those in the template.
// Creating the VM
const vm = new xenorchestra.Vm("xo-pulumi-tutorial", {
    memoryMax: 2 * 1024 * 1024 * 1024, // 2GB
    cpus: 1,
    nameLabel: "XO Pulumi Tutorial",
    template: template.then(t => t.id),
    networks: [
        {
            networkId: network.then(n => n.id),
        },
    ],
    disks: [
        {
            srId: storageRepository.then(sr => sr.id),
            nameLabel: "VM root volume",
            size: 50 * 1024 * 1024 * 1024, // 50GB
        },
    ],
});

// Export
export const vmId = vm.id;
export const vmName = vm.nameLabel;
export const ipv4 = vm.ipv4Addresses;
This code describes the characteristics of the VM to be created, including its
name,memoryandCPU. It uses the retrieved data to connect to the correct model, network and storage. -
Deploying the VM
It's time to bring our VM to life!
-
Run
pulumi upThis command will analyse your code and show you what it is about to do. The output will indicate that a new resource is going to be created.
pulumi upPulumi will then show you a preview of the changes and ask for confirmation before proceeding.
Previewing update (dev)

View in Browser (Ctrl+O): https://app.pulumi.com/batchayw-org/xo-pulumi-project/dev/previews/13fa0ed6-67f7-463d-8e18-83a1fa9571e2

    Type                      Name                   Plan
+   pulumi:pulumi:Stack       xo-pulumi-project-dev  create
+   └─ xenorchestra:index:Vm  xo-pulumi-tutorial     create

Outputs:
    ipv4  : [unknown]
    vmId  : [unknown]
    vmName: "XO Pulumi Tutorial"

Resources:
    + 2 to create

Do you want to perform this update? -
Confirm with
yesPulumi will then deploy the VM on Xen Orchestra.
Updating (dev)

View in Browser (Ctrl+O): https://app.pulumi.com/batchayw-org/xo-pulumi-project/dev/updates/1

    Type                      Name                   Status
+   pulumi:pulumi:Stack       xo-pulumi-project-dev  created (19s)
+   └─ xenorchestra:index:Vm  xo-pulumi-tutorial     created (17s)

Outputs:
    vmId  : "0ae54d06-e3e2-100c-00e8-46f67945e37c"
    vmName: "XO Pulumi Tutorial"

Resources:
    + 2 created

Duration: 21s
-
🚀🎉 Congratulations! Your VM has now been deployed via Pulumi on XO.
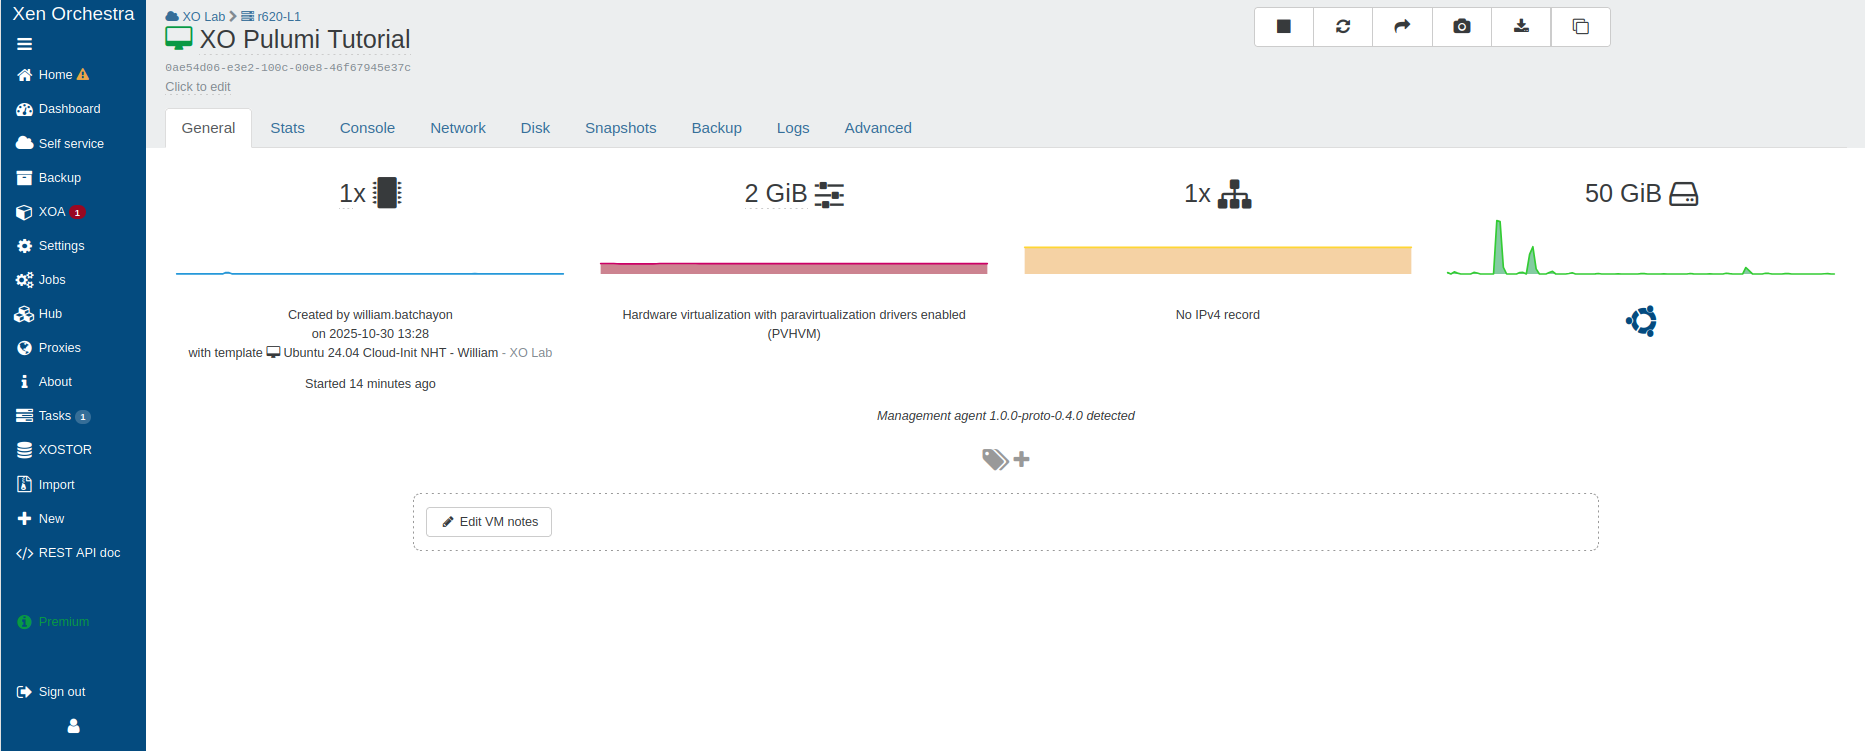
Any future changes to this VM can now be easily revised and versioned.
To demonstrate this, let's imagine that this VM needs a second network interface. Let's see how we can easily implement this change.
Updating existing infrastructure
One of Pulumi's greatest strengths lies in its ability to manage changes throughout your infrastructure's lifecycle.
Our goal is straightforward: to add a second network interface to the VM we just created.
To achieve this, simply edit the index.ts file and add a second network block to your VM definition.
// Create the virtual machine with two network interfaces
const vm = new xenorchestra.Vm("xo-pulumi-tutorial", {
    memoryMax: 2 * 1024 * 1024 * 1024, // 2GB
    cpus: 1,
    nameLabel: "XO Pulumi Tutorial",
    template: template.then(t => t.id),
    networks: [
        {
            networkId: network.then(n => n.id),
        },
        // Second network interface
        {
            networkId: network.then(n => n.id),
        },
    ],
    disks: [
        {
            srId: storageRepository.then(sr => sr.id),
            nameLabel: "VM root volume",
            size: 50 * 1024 * 1024 * 1024, // 50GB
        },
    ],
});
The process for applying changes is exactly the same as for creating them.
-
Run
pulumi upThis time, the output will be different. Pulumi has detected that the resource already exists and needs to be modified, not created. You will be able to see exactly which network block is going to be added.
Previewing update (dev)

View in Browser (Ctrl+O): https://app.pulumi.com/batchayw-org/xo-pulumi-project/dev/previews/9c687495-ba9d-4a8a-8446-f9bb8c2f1826

    Type                      Name                   Plan       Info
    pulumi:pulumi:Stack       xo-pulumi-project-dev
~   └─ xenorchestra:index:Vm  xo-pulumi-tutorial     update     [diff: ~networks]

Resources:
    ~ 1 to update
    1 unchanged

Do you want to perform this update? -
Confirm with
yesAfter confirmation, Pulumi will add the new network interface to your existing VM.
Updating (dev)

View in Browser (Ctrl+O): https://app.pulumi.com/batchayw-org/xo-pulumi-project/dev/updates/2

    Type                      Name                   Status            Info
    pulumi:pulumi:Stack       xo-pulumi-project-dev
~   └─ xenorchestra:index:Vm  xo-pulumi-tutorial     updated (29s)     [diff: ~networks]

Outputs:
    vmId  : "0ae54d06-e3e2-100c-00e8-46f67945e37c"
    vmName: "XO Pulumi Tutorial"

Resources:
    ~ 1 updated
    1 unchanged

Duration: 32s
With just a few lines of code, you can modify your infrastructure in a controlled and reproducible manner.
-
Before modification: single network interface
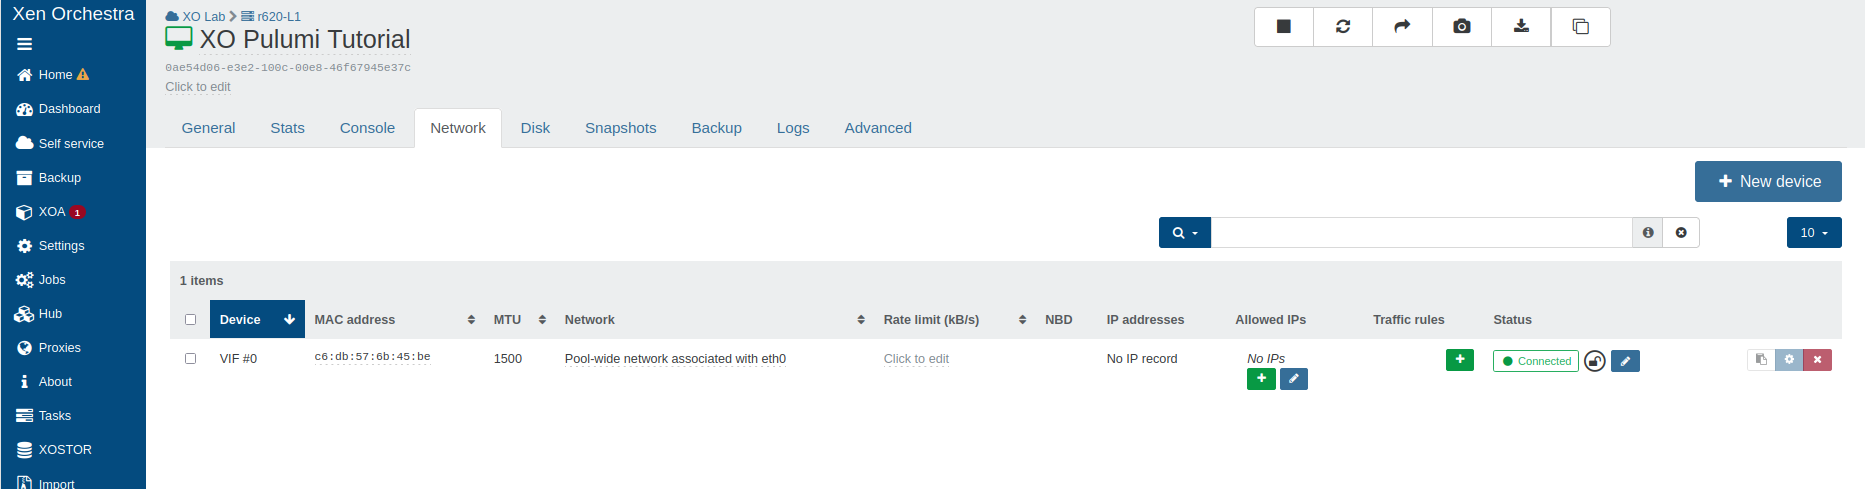
-
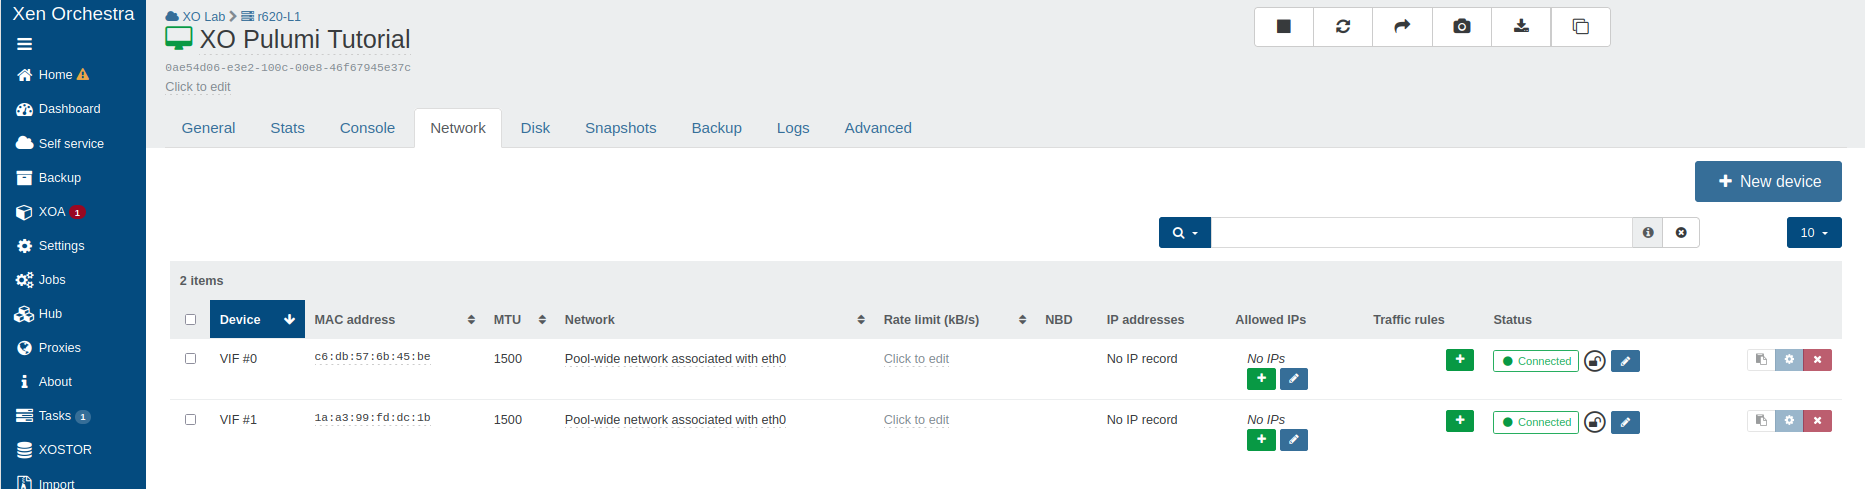
After adding the second network interface
Advanced Features
Using Cloud-Init
Pulumi supports cloud-init configuration to customize your VMs during deployment.
const vmWithCloudInit = new xenorchestra.Vm("vm-with-cloudinit", {
    // ... other parameters
    cloudConfig: `#cloud-config
users:
  - name: demo
    sudo: ALL=(ALL) NOPASSWD:ALL
    ssh-authorized-keys:
      - ssh-rsa <YOUR_PUBLIC_KEY_HERE>
packages:
  - nginx
  - git
runcmd:
  - systemctl enable nginx
  - systemctl start nginx
`,
});
Managing multiple disks
You can easily add multiple disks to a VM.
const vmWithMultipleDisks = new xenorchestra.Vm(“vm-multi-disk”, {
    // ... other parameters
    disks: [
        {
            srId: storageRepository.then(sr => sr.id),
            nameLabel: “System disk”,
            size: 30 * 1024 * 1024 * 1024, // 30 GB
        },
        {
            srId: storageRepository.then(sr => sr.id),
            nameLabel: “Data disk”,
            size: 100 * 1024 * 1024 * 1024, // 100 GB
        },
    ],
});
Tag configuration
Add tags to organize and manage your resources.
const taggedVm = new xenorchestra.Vm(“tagged-vm”, {
    // ... other parameters
    tags: [“production”, “web-server”, “pulumi-managed”],
});
Debugging and logs
The provider supports detailed logging to facilitate troubleshooting and debugging.
- Enabling Pulumi logs
To enable debug logging, use the verbosity flags.
pulumi up --debug
Or for more details
pulumi up --logtostderr -v=9
- Xen Orchestra provider logs
The Xen Orchestra provider also logs its activities. These logs can be viewed in the Pulumi output when debug mode is enabled.
Only enable debug logging when troubleshooting, as it can significantly increase log verbosity and impact performance.
Best practices
State Management
Pulumi state contains sensitive information about your infrastructure. Always use a secure backend such as a self-hosted solution or local encrypted storage.
# Configuration with local encrypted backend (recommended for full control)
pulumi login file://~          # Encrypted local storage in home directory
pulumi login --local           # Default location

# Or configuration with a self-hosted backend
pulumi login s3://my-pulumi-state-bucket
pulumi login gs://my-pulumi-state-bucket
pulumi login azblob://my-pulumi-state-bucket
Conclusion
The Pulumi provider for Xen Orchestra is an important step towards VirtOps, which involves applying DevOps practices to virtualisation. By adopting Infrastructure as Code with Pulumi, you can achieve greater reliability, reproducibility and efficiency while transforming infrastructure management into a more collaborative and auditable process.
For detailed documentation on the provider, see the official NPM package, which contains up-to-date information on all resources, data sources, and versions.